Skytap
Skytap AIX Landing Zone: Migrate AIX workloads to Skytap on Azure
Skytap offers several strategies for migrating AIX to Skytap on Azure. For detailed guidance, refer to the following URL: Skytap Migration Solutions.
The Skytap AIX landing zone accelerator outlines the strategic design and target technical state for migrating AIX on-premises systems to Skytap on Azure. This solution offers a comprehensive architectural framework and reference implementation, facilitating the transition of on-premises AIX environments to Skytap on Azure.
Architecture

👉Deploy Skytap AIX Landing Zone
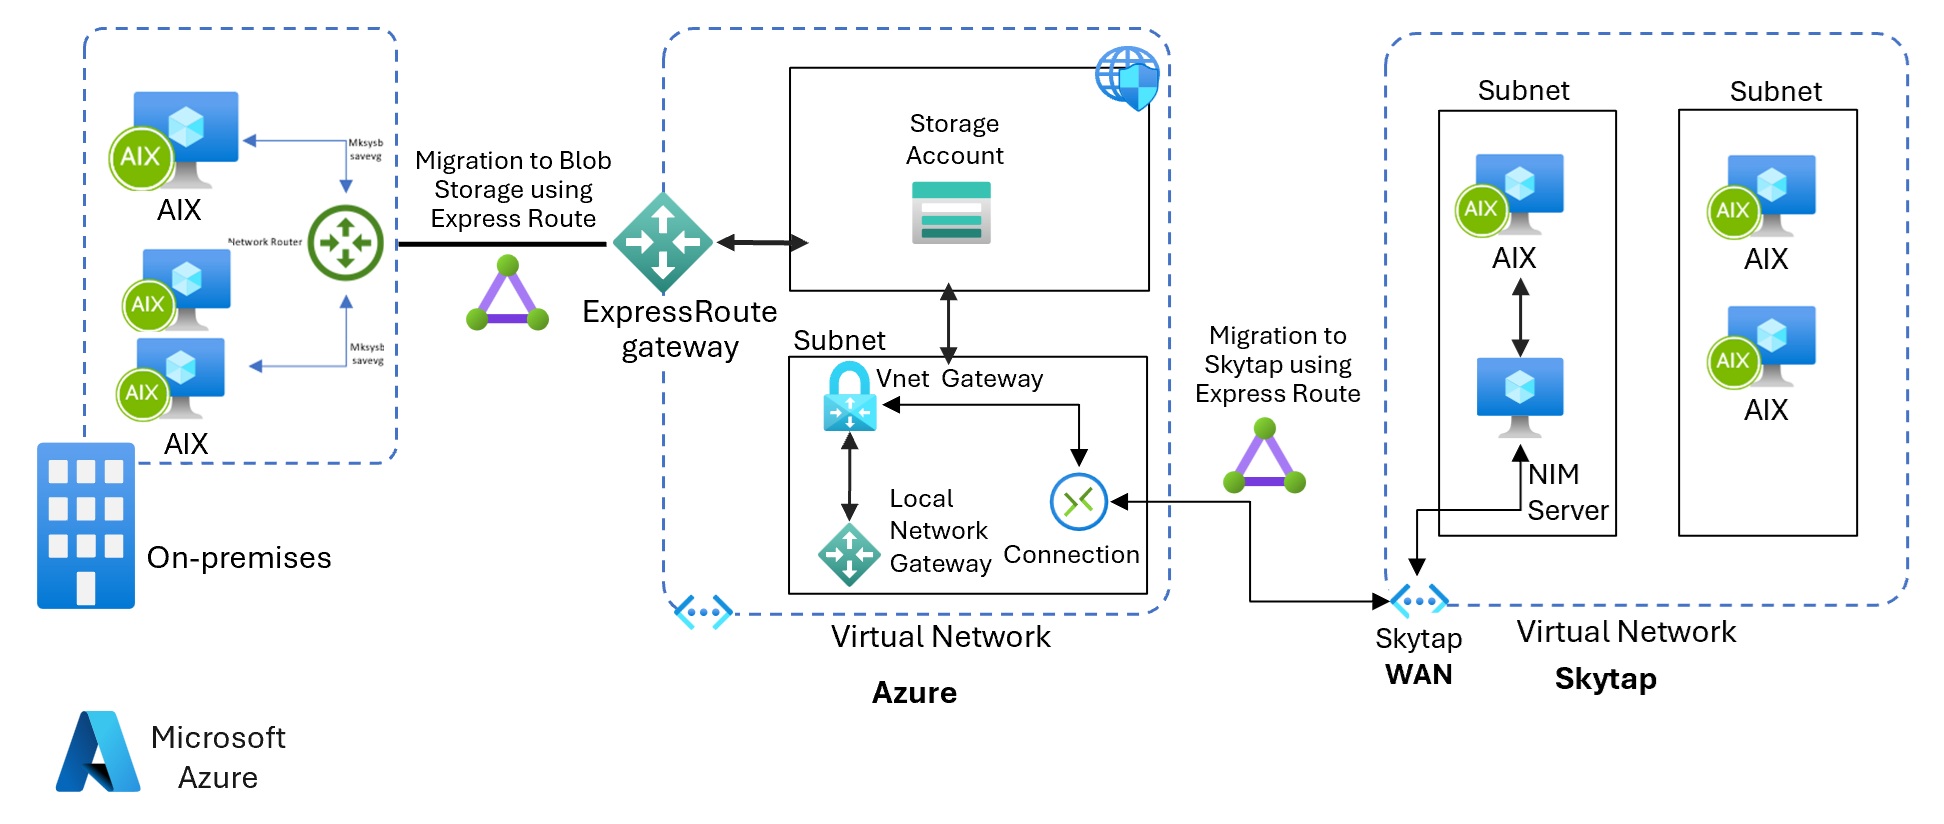
This architecture diagram outlines a structured approach for migrating AIX systems from an on-premises environment to Skytap on Azure. Let’s explore each component and understand the flow of the migration process:
On-premises Environment
- AIX Systems: These are the IBM AIX servers located in your local data center.
Microsoft Azure Components
- ExpressRoute Gateway: This component is used to establish a dedicated and private connection from the on-premises network to Microsoft Azure. It offers more reliability, faster speeds, and lower latencies than typical Internet-based connections.
- Virtual Network (VNet): This is the fundamental building block for your private network in Azure. VNets allow many types of Azure resources, such as Azure Virtual Machines (VM), to securely communicate with each other, the internet, and on-premises networks.
- Subnet: Subnets further segment the VNet, allowing you to organize and secure resources in discrete sections. This control can optimize network performance and apply different security policies.
- VNet Gateway: This connects different VNets together or connects VNets with on-premises networks. It is essential for routing traffic correctly within the Azure environment.
- Local Network Gateway: Represents the on-premises network within Azure. It is configured with the on-premises VPN device to establish a gateway-to-gateway VPN connection.
- Storage Account: Azure Storage Accounts provide a unique namespace to store and access your Azure storage data objects. Here it is used to store the Mksysb backup from the on-premises AIX systems.
- Jumpbox VM: This virtual machine will be utilized to move the Mksysb backup files to the Blob Storage using AzCopy.
Skytap on Azure
- Skytap WAN: Connects the Skytap environment in Azure with other networks, such as your on-premises network or other parts of Azure through VPNs or ExpressRoute customer-managed circuits. Represents a point of connection between Azure ExpressRoute and networks in Skytap environments.
- Subnets: Used within the virtual network to segment and manage the AIX workloads logically.
- NIM Server: The Network Installation Management (NIM) server is a critical component in AIX environments. It manages the installation and maintenance of AIX systems, acting as a server from which other AIX clients can install required software and updates.
Migration Pathways
-
Migration from on-premises to Blob Storage: This pathway involves transferring data from the on-premises AIX systems to Azure Blob Storage through ExpressRoute. This is typically an initial step to securely store the Mksysb backup of the on-premises AIX.
-
Migration from Blob Storage to Skytap: Following the backup, the actual system migration takes place where the AIX workloads are transferred from the Azure Blob Storage to the Skytap environment on Azure. This is facilitated by ExpressRoute or a VPN to ensure a secure and smooth transfer.
Overall Flow
Follow these assertive steps to efficiently migrate AIX systems from an on-premises environment to Skytap on Azure:
-
Prepare On-premises AIX Systems: Start by performing Mksysb backups of the on-premises AIX systems to secure your data.
-
Replicate Data to Azure Blob Storage: Transfer the mksysb backups to Azure Blob Storage using ExpressRoute or VPN for enhanced security and reliability. Then, transfer the backups from the blob storage to the Jumpbox VM.
-
Create NIM Server in Skytap: Create a NIM Server in your Skytap environment. You can do so by using the Skytap Portal or using the following Python Script to create NIM Server in Skytap
-
Migrate Backups to Skytap: Utilize ExpressRoute or VPN to transfer the mksysb backup files to Skytap. Securely copy these files from the Jumpbox VM to the Network Installation Management (NIM) server using SCP. Download WinSCP
-
Restore Mksysb Files: Initiate the Mksysb restoration process on the target systems within Skytap.
-
Add Filesystem to Restored LPARs: Include necessary temporary space on the restored Logical Partitions (LPARs) for savevg and database files.
-
Transfer Additional Backup Files (copy savevg and DB files to temporary disk on restore target): Copy savevg and database files to the temporary disk space allocated on the restoration targets.
-
Restore Savevg and Database Files: Complete the restoration of savevg and database files to ensure all system and application data is accurately reinstated.
-
Manage and Maintain AIX Environments in Skytap: Use the NIM server within Skytap to manage and maintain the AIX environments, ensuring optimal performance and efficient operation in their new cloud context.
Important Note: Be mindful that Skytap has a storage limitation of 4 TB for x86 VMs. This constraint means that using a Windows VM in Skytap with azcopy might not be feasible for handling large data volumes due to insufficient storage capacity. Plan accordingly to accommodate data management within these limits.